Shelter Institute: Learn How to Build Your Own House in 2 Weeks

My Money Blog has partnered with CardRatings and may receive a commission from card issuers. Some or all of the card offers that appear on this site are from advertisers and may impact how and where card products appear on the site. MyMoneyBlog.com does not include all card companies or all available card offers. All opinions expressed are the author’s alone.

siframeWhile listening to a Tim Ferriss podcast with guest Mr. Money Mustache, I came across this quote from John Taylor Gatto in the comments. Apparently Gatto was not a fan of compulsory schooling and offered this instead:

I want to give you a yardstick, a gold standard, by which to measure good schooling. The Shelter Institute in Bath, Maine will teach you how to build a three thousand square-foot, multi-level Cape Cod home in three weeks’ time, whatever your age. If you stay another week, it will show you how to make your own posts and beams; you’ll actually cut them out and set them up. You’ll learn wiring, plumbing, insulation, the works. Twenty thousand people have learned how to build a house there for about the cost of one month’s tuition in public school.

The idea of building your own home is certainly romantic. I was pleased to learn that the Shelter Institute is still going strong, offering a 2-week Design and Build Class that costs $1,500 for one person ($2,500 for a couple) on their 68-acre campus in Maine. I guess people drive or fly there and stay nearby; they have housing options starting at $100 a week. Classes run from 8am to 5:30pm every day:

Intensive courses that provide you with extensive home building knowledge from site planning to foundations, insulation, engineering, design, wiring, plumbing, tool knowledge and the ability to Design and Build. Whether you have been dreaming of building a home or are already heavily involved in the building industry; the Design Build course or the Contract-It-Yourself course will provide a new understanding of construction and confidence in your ability to complete a project.

I gained some additional insight into the general concept of building your own home in Building a Home of Your Own, an article at the Federal Reserve Bank of Boston for some reason:

For those who desire more individual instruction, the Shelter Institute offers intensive one- to three-week classes on all aspects of house construction. In business since 1974, the Shelter Institute has taught 25,000 students who have gone on to build 8,000 homes. “A lot of people come here thinking that there’s some magic thing they have to learn to know how to build a house,” reported Patsy Hennin, the Institute’s co-founder, in a recent interview with Down East magazine, “but there aren’t any secrets. Perseverance is the biggest thing. Gadgets aren’t the answer. It’s not about how to use a hammer; it’s about how to use your head.”

There are many books and “courses” that about building your own home, but I doubt it can replace an interactive environment where you are handling the tools and watching actual houses being built in person. A few similar schools will teach you to build your own log cabin in 5 days or build your own tiny house in a week.

According to 2016 data from the US Census, only about 6% of new single-family homes are “owner-built”, which means built entirely by the landowner or by the landowner acting as his/her own general contractor. A former manager of mine was the general contractor on his own new construction and also did the electrical wiring and other parts himself. I don’t know if I’ll ever build my own home, but I’m happy that there are still DIY folk out there doing such things. These intensive courses sound like a cool vacation idea actually (if someone could watch the kids).
My Money Blog has partnered with CardRatings and may receive a commission from card issuers. Some or all of the card offers that appear on this site are from advertisers and may impact how and where card products appear on the site. MyMoneyBlog.com does not include all card companies or all available card offers. All opinions expressed are the author’s alone, and has not been provided nor approved by any of the companies mentioned.

MyMoneyBlog.com is also a member of the Amazon Associate Program, and if you click through to Amazon and make a purchase, I may earn a small commission. Thank you for your support.


IKEA Small Space Floor Plans: 240, 380, 590 sq ft

My Money Blog has partnered with CardRatings and may receive a commission from card issuers. Some or all of the card offers that appear on this site are from advertisers and may impact how and where card products appear on the site. MyMoneyBlog.com does not include all card companies or all available card offers. All opinions expressed are the author’s alone.

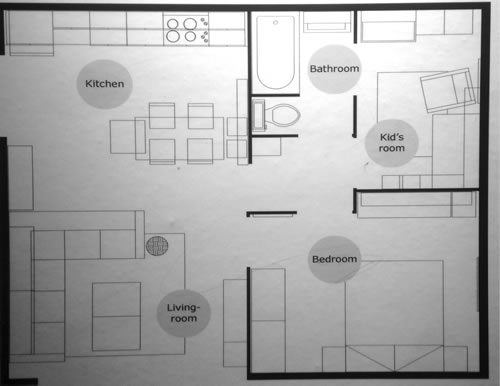
While walking through an IKEA home furnishings store last week I saw a bunch of neat “model homes” that took up very little space. Supposedly every IKEA store has their own sampling of small space floor plans – only a few are profiled on their website – so here are some pictures and videos that I took with my smartphone. (Apologies in advance for the poor film quality.) Some of the tight designs require specific wall positioning, but many of the concepts could be used to maximize the space in any home.

590 sf Floor Plan – 1.5 Bedroom, 1 Bath
This home is designed for a young couple with a young child. The kitchen island doubles as the family dinner table. The main bedroom is a pretty decent size, and floor-to-ceiling closets and shelving maximizes storage. I call this a 1.5 bedroom floor plan because the “kid’s room” is fine for a crib but would be really tight for a twin bed. If you could move walls you could take some space from the kitchen.


380 sf Floor Plan – Studio w/ Separate Bedroom
This studio layout means there are no walls between the bedroom and the living room, but at least they are separate spaces. The kitchen is actually a pretty good size, but there is no room for a dining table. I think the kitchen counter is meant to be the eating space. Designed for one or two people.

[Read more…]

My Money Blog has partnered with CardRatings and may receive a commission from card issuers. Some or all of the card offers that appear on this site are from advertisers and may impact how and where card products appear on the site. MyMoneyBlog.com does not include all card companies or all available card offers. All opinions expressed are the author’s alone, and has not been provided nor approved by any of the companies mentioned.

MyMoneyBlog.com is also a member of the Amazon Associate Program, and if you click through to Amazon and make a purchase, I may earn a small commission. Thank you for your support.


Awesome Space-Saving and Multi-Tasking Furniture

My Money Blog has partnered with CardRatings and may receive a commission from card issuers. Some or all of the card offers that appear on this site are from advertisers and may impact how and where card products appear on the site. MyMoneyBlog.com does not include all card companies or all available card offers. All opinions expressed are the author’s alone.

Thinking about simplifying your life and living in less space? Perhaps you already live in a small space. If you haven’t heard of Resource Furniture, you should definitely check out this video of space-saving and transforming furniture from their store in New York City, land of the 250 sf studio. These are way beyond your standard Murphy beds.

I love the innovation here, although I have a feeling this stuff comes at a relatively steep premium. Their website doesn’t show prices (must ask for quote), but I’ve read around $8,000 for a bed/sofa combo. I wonder how long it will take to these designs to trickle down to mass market stores. Via Reddit.

My Money Blog has partnered with CardRatings and may receive a commission from card issuers. Some or all of the card offers that appear on this site are from advertisers and may impact how and where card products appear on the site. MyMoneyBlog.com does not include all card companies or all available card offers. All opinions expressed are the author’s alone, and has not been provided nor approved by any of the companies mentioned.

MyMoneyBlog.com is also a member of the Amazon Associate Program, and if you click through to Amazon and make a purchase, I may earn a small commission. Thank you for your support.


Terminix Inspection and Protection Plan For Termites: Worth It?

My Money Blog has partnered with CardRatings and may receive a commission from card issuers. Some or all of the card offers that appear on this site are from advertisers and may impact how and where card products appear on the site. MyMoneyBlog.com does not include all card companies or all available card offers. All opinions expressed are the author’s alone.

Another one of my new joys of home ownership is having to worry about termites eating my house from the inside out. Munch munch munch! The previous owners were signed up for something called the Terminix Inspection and Protection Plan, and the bill for next year came in recently so I’m trying to decide whether to renew. According to the Terminix website, it includes

  • Certified annual inspection of your home and property
  • No termite control fees if activity is found
  • Free repairs of new termite damage upon discovery of live activity

The price is supposed to vary by area but for me it costs about $300 per year. This fee does not include any sort of preventative treatment.

So basically, I pay a regular annual fee which will cover all of my future termite control costs. Sort of a termite insurance plan. Well, almost all because the fine print excludes drywood termites, which are different from the more common ground or subterranean termite. According to Orkin, subterranean termites cause 95% of all termite damage in North America. However, they also thrive primarily in warmer coastal areas like where I live. So… I don’t know if this is a big deal or not.

Annual Inspection – Visual Only
I’ve already experienced an annual inspection earlier in the year, and I wasn’t really impressed. Basically a guy shows up with a stick and walks around the inside and outside of your house looking for evidence of termite activity. He looked under the sinks, inside cabinets, and pokes a few spots here and there. He did not inspect the attic, which would seem to be an easier place to spot termite damage. It took less than 20 minutes.

I pointed out a beam in the garage that had a hole in it and that released what looked like termite droppings (little brown salt-sized bits) when poked. He confirmed that it was termite droppings, but concluded they were old and there was no live termites. The house had been treated for termites when we bought it, so he might be right. But how can he tell that they haven’t returned? He didn’t take any samples for testing, take pictures, or anything like that.

No More Termite Bait Traps
Since our house has a bunch of those little green termite bait traps all around the outside, I thought he’d be checking those as well. Nope, it turns out that they stopped using that system (at least in my area). That struck me as lazy and/or cheap. I’d much rather be able to lift up a cylinder and see if there are termites lurking around, rather than only rely on seeing termite poop or actual visual damage to my house. I mean, look at this little factoid taken from their own site:

Costs vs. Alternatives
In the end, I’m not all that excited to pay $300 for someone to visit my home once a year, especially when they have an incentive to not find anything wrong. I don’t even get any preventative treatments, say once every 3 years or something. I haven’t gotten a quote back from Orkin yet, but according to their website they still do the bait and monitoring system.

According this CostHelper page, chemical treatment would cost around $1,350-$2,500 and a tent fumigation would cost $1,200-$2,500 for a 1,250 square foot house. Extreme damage would involve wall removal and replacement, which Terminix supposedly covers but sometimes only with a fight (see below).

Consumer Complaint Websites
I read through this RipOffReport page as well as this Terminix Consumer Alert page.

What do you think? Anyone have any experience with Terminix, especially their “Inspection and Protection Plan”?

My Money Blog has partnered with CardRatings and may receive a commission from card issuers. Some or all of the card offers that appear on this site are from advertisers and may impact how and where card products appear on the site. MyMoneyBlog.com does not include all card companies or all available card offers. All opinions expressed are the author’s alone, and has not been provided nor approved by any of the companies mentioned.

MyMoneyBlog.com is also a member of the Amazon Associate Program, and if you click through to Amazon and make a purchase, I may earn a small commission. Thank you for your support.


DIY Installation of Floating Engineered Hardwood Flooring

My Money Blog has partnered with CardRatings and may receive a commission from card issuers. Some or all of the card offers that appear on this site are from advertisers and may impact how and where card products appear on the site. MyMoneyBlog.com does not include all card companies or all available card offers. All opinions expressed are the author’s alone.

I’m happy to say that our hardwood floors are fully installed! The bulk of the credit has to go to my father-in-law, who while he has never installed any hardwood flooring before, provided the peripheral knowledge and common sense that is need in doing such home projects. My wife and I basically served as unskilled day laborers. 🙂 If you’re looking to install your own wood flooring, you might want check out my previous post on picking out what type of flooring to buy and how to install it. We had a concrete subfloor, and we chose to float an engineered hardwood flooring over it. This might not be the best choice for everyone.

Prepping the Concrete Floors
The first part of installation is to make sure you have a relatively level subfloor. A rough rule of thumb is that you want to see no gaps thicker than 1/8″ of space if you lay down a 5 ft-long straight piece of wood like a 2×4 flat on the ground. (Or 1/4″ every 10 feet.) This part is important in order to avoid squeaks and squishy spots, and lazy installers (both hired and DIY) will simply lay over anything remotely flat. If you do demand proper prep and your floor isn’t flat, this can add to installation costs when contracting it out (and therefore savings if you do it yourself).

We were hoping preparation would just mean scraping excess carpet glue or drywall mud off of the subfloor. But we found that we actually had a good-sized area which was not flat at all. We tried using a hand grinder at first, but in the end we rented what they called a concrete planer in order to grind it down flat. It is a beast and we ended up with over 30 pounds of concrete dust everywhere. We had put up tarps, but it still got everywhere. This would have been horrible if we were already living in the house, luckily we weren’t. I think it cost about $250 to rent for a day.

Laying Underlayment
Next step was to lay down a thin blue foam underlayment on top of the concrete. The underlayment is designed as a moisture barrier between the wood and the concrete, reduces sound, and also adjust for the remaining minor irregularities in the subfloor. We just taped it down with duct tape. Some newer flooring products actually have this already on the bottom of the flooring.
Connecting The Pieces Together
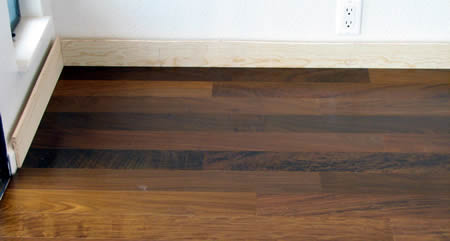
Our flooring was tongue-in-groove, with glue applied in the grooves. Some other types allow you to simply click together, but we found this was mainly for laminate flooring. We put in spacers at the walls, as the floating floor has to be allowed to contract and expand with the seasons. Trim is added later to hide the gaps. You’ll need some sort of table or chop saw to cut the pieces to fit when you reach the other wall and at corners.

Trim and Moldings
Finally to make everything look nice, you’ll need to install moldings at walls, doorways, and transitions to other floor types. You’ll also have to cover up all the nail holes with putty so they don’t show. This all takes a lot of patience to do well, which can be tough when you’re tired of installing wood and you just want to be done already.

Final Verdict and Parting Advice…
We are very happy with the final product. I think anybody who is reasonably comfortable with tools and has the proper patience can perform this activity, the only question is if you actually want to. Either using up a week of vacation or giving up all your weekends for a month isn’t always fun, although I did learn a lot and lost some weight in the process. Oh, and there’s always the several thousand dollars in installation costs that we saved.

We do have some squishiness in the floor when walking on it, but it is not very prominent and we don’t mind. Of course it wouldn’t be there at all if we decided to do a glue-down floor, but I think it was still worth it to float given the time saved and the ability to easily fix any mistakes as we went.

As for parting advice… buy good knee pads! My father-in-law is old school and tough, and didn’t ever wear knee pads the entire time, so I figured I didn’t need them either. On the second day of installation, I started seeing red spots all over the underlayment. Did someone spill ketchup? Nope, my knees had blistered and were bleeding all over the place… Good knee pads are worth every penny. In general, it is worth it to buy the proper, quality tools for the job. If you’re doing this is as a weekend warrior type of activity, it takes a lot of determination to finish everything, so there’s no need to make things harder on yourself.

My Money Blog has partnered with CardRatings and may receive a commission from card issuers. Some or all of the card offers that appear on this site are from advertisers and may impact how and where card products appear on the site. MyMoneyBlog.com does not include all card companies or all available card offers. All opinions expressed are the author’s alone, and has not been provided nor approved by any of the companies mentioned.

MyMoneyBlog.com is also a member of the Amazon Associate Program, and if you click through to Amazon and make a purchase, I may earn a small commission. Thank you for your support.


Sweat Equity: Removing Old Carpet Yourself

My Money Blog has partnered with CardRatings and may receive a commission from card issuers. Some or all of the card offers that appear on this site are from advertisers and may impact how and where card products appear on the site. MyMoneyBlog.com does not include all card companies or all available card offers. All opinions expressed are the author’s alone.

We bought a house with some flaws, and one of them was this shag carpet complete with old pet stains. Before we can install our desired hardwood flooring, we had to remove the dirt magnet. After asking around, the price for professional carpet removal is about $0.35 per square foot. For the 1,500 sf of carpet we had, that’s a potential cost of over $500. Armed with the knowledge and help of our father-in-law, we set forth to do it ourselves.

There are a plenty of online tutorials on how to remove your old carpet (one, two, three), but in general it’s pretty straightforward:

  1. Remove all furniture.
  2. Pull up carpet, cut into strips, roll up, remove.
  3. Repeat #2 with the carpet pad underneath.
  4. Pry up tackstrips, and tons of nails
  5. Scrape glue off of subfloor.
  6. Sweep up remaining crap.

In our house, the pad underneath the carpet was glued down to the concrete subfloor. The original installers were generous (or just lazy) with the glue and squirted it everywhere, so scraping the petrified stuff up took forever. The only new tool we bought was a special scraper blade, for about $10. Otherwise you just need a utility knife, some rope/tape, pliers, and a crowbar.

Was it worth saving $500? My aching back says no, but at least now I know how to remove carpet. Also, occasionally it’s nice to perform some manual labor and feel like you accomplished something tangible. Occasionally.

My Money Blog has partnered with CardRatings and may receive a commission from card issuers. Some or all of the card offers that appear on this site are from advertisers and may impact how and where card products appear on the site. MyMoneyBlog.com does not include all card companies or all available card offers. All opinions expressed are the author’s alone, and has not been provided nor approved by any of the companies mentioned.

MyMoneyBlog.com is also a member of the Amazon Associate Program, and if you click through to Amazon and make a purchase, I may earn a small commission. Thank you for your support.